GV-02 Crack Detection
GV-02 Machine Vision Magnetic Particle Inspection
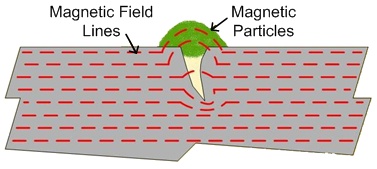
Magnetic Particle Inspection (MPI) is one of the most widely used methods of non-destructive testing. The technique is used for detection of surface and near-surface flaws in ferromagnetic materials. The process involves magnetizing a part, during which time ferromagnetic particles – either suspended in a fluid or in a powder form – are applied. A surface flaw will highly distort the magnetic lines of force and this is known as flux leakage. Fine magnetic particles distributed over the part will be attracted to the areas of the flux leakage, creating a visible indication of the flaw. In most cases, the magnetic particles are coated with a fluorescent material enabling them to viewed in darkened conditions. Magnetic particle inspection is commonly used to inspect castings, weldments, forgings, and machined or stamped parts.
GV-02 Automated Solution for Inspection
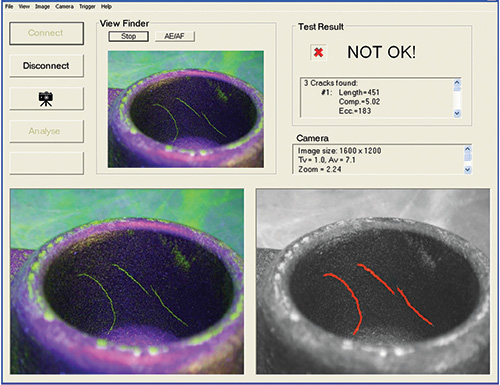
GV-02 is a camera-based automated inspection system for MPI flaw detection. It is ideally suited to applications where high speed and consistent inspection is required. High resolution and advanced image processing features provide accurate and reliable detection of the most subtle defects. The inspection facilities can accommodate a wide range of part sizes and shapes. Simultaneous dual camera processing allows inspection of parts from two different directions or with a higher resolution for large parts.
The decision making process for locating flaws and separating acceptable and unacceptable parts can be modified by integrating expert knowledge in the system. GV-02 provides various automatic documentations such as image archiving with mapping of flaws, piece parts counter and statistical reports for quality control.
… best alternative for human inspectors
The analysis and detection of flaws in batch inspection is a monotonous and strenuous task for a human inspector whose outcome depends on many subjective factors. Proper analysis requires considerable skill, experience, and acuity of the observer and this can vary with fatigue during a working day. The lighting around and on the specimen must be suitable arranged to help the observer. The evaluation time and dark adaptation time for inspector’s eyes is slow. In addition, ultraviolet light cause eyestrain and headache leading to low task performance.
GV-02 offers the best alternative solution with much more advantages:
- No inspector fatigue
- Increase reliability and speed
- Ensure consistent inspection
Features
- Easy and standard user interface
- Image enhancement tools to compensate for background illumination changes and fluorescent filter
- Masking tool to define region of inspection
- Dual camera processing
- Programmable I/O for loading/unloading and sorting
- Documentation and statistical report
Examples of Crack Detection